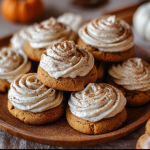

Hello there! Are you ready to brighten your day with a little sweetness? One of my absolute favorite desserts to whip up is these adorable mini lemon cheesecakes! They’re not just cute but also bursting with fresh lemon flavor and a creamy goodness that makes them hard to resist. Whether it’s a sunny day or you just want a pick-me-up, these little bites of joy will surely put a smile on your face!
Nutritional Benefits of Mini Lemon Cheesecakes
Now, let’s talk about why these mini lemon cheesecakes can be a fabulous treat! First, lemons are loaded with vitamin C, which is great for your immune system, and they can help brighten your mood, thanks to their fresh, zesty flavor. Plus, with the addition of cream cheese and sour cream, you’re getting a dose of calcium and protein! So, it’s safe to say you can feel a bit guilt-free indulging in these delightful bites.
Adaptable Variations to Consider
- Gluten-Free Option: If you’re following a gluten-free diet, you can easily substitute regular graham crackers with gluten-free crackers or almond flour to make the crust!
- Dairy-Free Choice: For a dairy-free version, you can use vegan cream cheese and coconut whipped cream to keep it yummy.
- Sweetener Swap: Want to reduce sugar? Use a natural sweetener like honey or maple syrup instead of granulated sugar. Just remember to adjust your measurements accordingly!
- Zesty Variations: If you’re a lime lover, feel free to swap out the lemon juice and zest for lime. It’s a fun twist that gives a whole new flavor profile!
Delicious Mini Lemon Cheesecakes Recipe
Ingredients
- 1 cup graham cracker crumbs
- 1/4 cup unsalted butter, melted
- 2 cups cream cheese, softened
- 1 cup granulated sugar
- 1/4 cup sour cream
- 2 large eggs
- 2 tablespoons lemon juice
- Zest of 1 lemon
- 1/4 teaspoon vanilla extract
- Lemon curd (for topping)
- Whipped cream (for decoration)
- Lemon slices (for garnish)
- Fresh mint leaves (for garnish)
Cooking Instructions
- Preheat the Oven: First things first, let’s get that oven ready! Preheat it to 325°F (160°C) so it’s nice and warm when your cheesecakes go in.
- Prepare the Crust: In a medium bowl, mix the graham cracker crumbs with the melted butter until combined. It should feel like wet sand. Now, press this mixture gently into the bottom of mini cheesecake molds or cupcake liners to form a solid base.
- Make the Cheesecake Mixture: In a large mixing bowl, use an electric mixer to beat the softened cream cheese until it’s creamy and smooth. Gradually add in the granulated sugar and mix until everything is well combined.
- Add the Remaining Ingredients: Next, add the sour cream, eggs (one at a time), lemon juice, lemon zest, and vanilla extract. Blend till the mixture is smooth and there are no lumps.
- Fill the Molds: Carefully pour the cheesecake mixture over your prepared crusts, filling each mold to the brim.
- Bake the Cheesecakes: Pop those little beauties into your preheated oven! Bake for 20-25 minutes. The centers should be set but still have a slight jiggle when you move them.
- Cool Down: Once done, take them out and let them cool at room temperature for about 10 minutes before putting them in the refrigerator to chill for at least 4 hours (overnight if you can wait—trust me, it’s worth it!).
- Prepare for Serving: After chilling, gently remove the mini cheesecakes from their molds, setting them aside on a serving platter.
- Garnish: Top each cheesecake with a dollop of lemon curd, swirl some whipped cream on top, and finish it off with a slice of lemon and a fresh mint leaf.
- Serve: Arrange your delightful mini lemon cheesecakes on a platter and get ready to impress anyone who has the pleasure of tasting them!
Practical & Valuable Tips
- For super moist cheesecakes, do not overbake them. You want a slightly creamy center that firms up as they chill.
- If you’re having trouble removing them from the molds, run a butter knife around the edges to help loosen them up.
- You can make these mini cheesecakes ahead of time; they’ll keep in the fridge for up to 5 days. Just hold off on adding the toppings until you’re ready to serve!
- If you’re feeling adventurous, mix in some fresh berries into the cheesecake batter for a fruity twist!
Equipment Needed
To make your baking a breeze, here’s what you’ll need:
- Mini cheesecake molds or cupcake liners
- A mixing bowl
- Electric mixer (handheld or stand mixer)
- Spatula for scraping down the sides of the bowl
- Measuring cups and spoons
- Baking sheet (if using molds)
Frequently Asked Questions
- Can I freeze these mini cheesecakes? Yes, you can! Just wrap them tightly in plastic wrap and store them in an airtight container for up to 3 months. They’re great to have on hand!
- What can I substitute for sour cream? You can use Greek yogurt as a healthier alternative. It might add a slight tang but it’ll still taste fantastic!
- How do I ensure my cheesecakes don’t crack? Baking at a lower temperature and a water bath can help prevent cracks, but as long as they’re delicious, a few cracks never hurt anyone!
- What’s the best way to store leftovers? Keep them in an airtight container in the refrigerator for up to 5 days.
- Can I use a different kind of cheese? You can try mascarpone for a richer flavor, but it might alter the final taste and texture.
I hope you’re excited to make these mini lemon cheesecakes because I genuinely think you’ll love them! When you do, I’d love to hear how they turn out. Snap a picture and tag me on Pinterest for more delightful recipes and a sprinkle of inspiration in your kitchen!