
Welcome to My Sweet Kitchen!
Hey there! If you’re like me, you probably have sweet cravings that can hit at any moment, and today I’m excited to share a recipe that satisfies those cravings fabulously—Brown Sugar Pop Tart Cookies! They’re soft, chewy, and bursting with irresistible sweetness. Trust me; these cookies will be a hit with anyone who tries them. Plus, they’re super fun to make, and I can bet you already have most of the ingredients in your pantry!
Why You’ll Love These Cookies
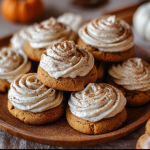
First of all, who doesn’t love a good chewy cookie? These Brown Sugar Pop Tart Cookies have the perfect texture, combining a soft baked edge with a delightful gooey caramel filling. And that drizzle of melted chocolate on top? Absolutely divine. They remind me of the classic pop tarts from childhood, but this homemade version is much better! You’ll be proud to serve them to friends or family, and they’re perfect for any occasion—from casual snacks to special celebrations.
Nutritional Benefits
Even though these cookies are a dessert treat, they can have some perks! The brown sugar adds a deeper flavor without overwhelming the sweetness, and using whole butter helps create that lovely soft texture we all adore. Plus, if you sneak in some nuts or seeds, you can easily spruce up the nutrient profile! Just remember, everything is better in moderation, so enjoy every bite!
Fun Variations
Feeling adventurous? Here are some easy ways to customize your Brown Sugar Pop Tart Cookies:
- Chocolate Lovers Unite: Swap out the caramel for Nutella or another chocolate spread to take it over the top!
- Fruit Filling: Add a fruit jam (like raspberry or strawberry) instead of caramel for a fruity twist.
- Spicy Kick: Mix in some cinnamon or a pinch of cayenne pepper into the batter for a fun, spicy note.
Heavenly Brown Sugar Pop Tart Cookies Recipe
Ingredients
- 2 cups all-purpose flour
- 1/2 cup unsalted butter, softened
- 1/2 cup brown sugar, packed
- 1/2 cup granulated sugar
- 1/2 teaspoon salt
- 1/2 teaspoon baking powder
- 1 large egg
- 1 teaspoon vanilla extract
- 3/4 cup caramel sauce
- 1 cup semisweet chocolate chips
- 1 tablespoon milk (for melting chocolate)
- Coarse sea salt (for topping)
Instructions
- Preheat the Oven: Preheat your oven to 350°F (175°C) and line a baking sheet with parchment paper. This prevents sticking and makes cleanup a breeze!
- Prepare the Dough: In a large mixing bowl, use a hand mixer to beat together the softened butter, brown sugar, and granulated sugar until the mixture is light and fluffy. This step makes sure your cookies are soft and chewy!
- Add Egg and Vanilla: Mix in the egg and vanilla extract until well combined. The aroma of vanilla in your kitchen is already making me smile!
- Combine Dry Ingredients: In a separate bowl, whisk together the flour, salt, and baking powder. Gradually add the dry ingredients to the wet mixture, mixing until just combined. You don’t want to overmix here—let those chewy textures shine!
- Form the Cookies: Roll out the dough on a floured surface to about 1/4 inch thickness. Cut into rectangles (approximately 3×4 inches) using a sharp knife or a cookie cutter. Have fun with this part!
- Assemble with Filling: On half of the rectangles, add about a teaspoon of caramel sauce, spreading it out but keeping it away from the edges. Top with another rectangle and press the edges to seal. Use a fork to crimp the edges for a decorative touch and better sealing.
- Bake the Cookies: Place the assembled cookies on the prepared baking sheet. Bake in the preheated oven for 12-15 minutes or until the edges are lightly golden. Once they’re done, let them cool on the baking sheet for a few minutes before transferring them to a wire rack. Your house is going to smell amazing!
- Prepare the Chocolate Topping: While the cookies are cooling, melt the chocolate chips with milk in a microwave-safe bowl, stirring every 30 seconds until smooth. Make sure to keep an eye on it to avoid burning!
- Top the Cookies: Drizzle the melted chocolate over the cooled cookies using a spoon or a piping bag. While the chocolate is still warm, sprinkle coarse sea salt on top for an added crunch and flavor—trust me, it’s a game changer!
- Let Set and Serve: Allow the chocolate to set completely before serving. Enjoy your homemade Brown Sugar Pop Tart Cookies warm or at room temperature, and watch them disappear!
Practical & Valuable Tips
- Storage: Keep these cookies in an airtight container at room temperature for 3-5 days—if they last that long!
- Serving: These cookies are delightful on their own, but you can also serve them with a scoop of vanilla ice cream for a truly indulgent dessert.
- Substitutions: You can replace the caramel sauce with a fruit jam if you’d prefer something fruity! It adds a wonderful twist to the flavor.
Equipment Needed
Here’s a quick list of the tools you’ll need to whip up these delicious cookies:
- A hand mixer for easy mixing
- A mixing bowl for the dough
- A rolling pin for flattening the dough
- A sharp knife or cookie cutter for cutting out the cookies
- A baking sheet lined with parchment paper
- A microwave-safe bowl for melting chocolate
- A wire rack for cooling the cookies
Frequently Asked Questions
- Can I make these ahead of time? Absolutely! You can make the dough in advance, freeze it, and then bake them fresh whenever you’re ready.
- What can I use instead of caramel sauce? You can swap it out with any fruit jam or chocolate spread. It’s all about personal preference!
- How do I know if my cookies are perfectly baked? They should be lightly golden around the edges, and still soft to the touch in the center. They’ll firm up as they cool!
- Can I add nuts to the dough? Yes, chopped nuts like walnuts or pecans can be added to the dough for some extra crunch!
- Can these cookies be frozen? Definitely! Store them in an airtight freezer bag for up to 3 months. Just thaw them at room temp before serving!
Join the Sweet Adventure!
Now that you have this delightful recipe, I can’t wait to hear how your Brown Sugar Pop Tart Cookies turn out! If they put a smile on your face, please take a moment to share your experience with me. Also, don’t forget to pin this recipe on Pinterest for easy access later! Let’s keep sharing the sweet joy of baking together!